
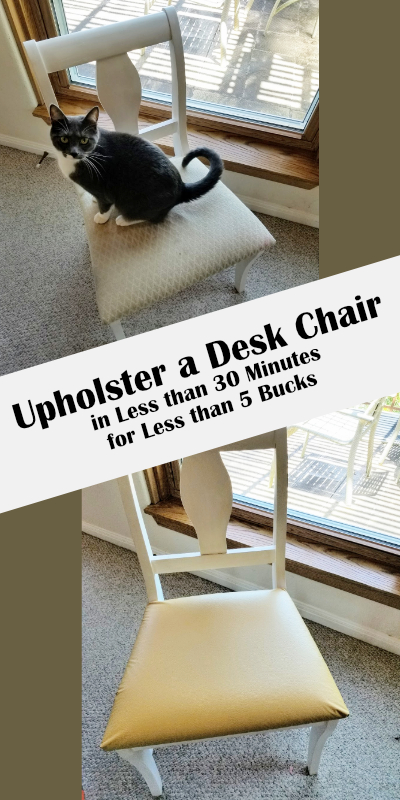
Revamping this old desk chair was the simplest DIY ever, taking about 30 minutes all said and done (without me entirely knowing what I was doing). This can be a quick craft to modernize any dining or desk chairs you have around the house with a couple tools and as cheap as a couple bucks.
Tools:
- Screwdriver
- Staple gun
- Scissors
Supplies:
- Fabric
- Chair

I purchased this yellow vinyl from Fabric.com because it cost only a few dollars for a yard, and I needed a thicker, non woven material so that my cat wouldn’t scratch it (the reason I had to give away my previous desk chair). I recently painted the desk and chair white, so I wanted a bit of brightness as well.
Now that the materials are together, to get started I unscrewed the 4 screws keeping the seat attached to the chair frame. It may vary based on the chair, but generally it should be simple.

I decided I would leave the old upholstery on the chair because other than a couple stains, its not radioactive or anything, so why not keep using it. Now with the seat unattached, I laid the fabric around the seat and cut out the upholstery, leaving a few inches on every side.

I started by stapling one long side across, flipped it around, pulled the fabric taut, and stapled the opposite side across too.

This is where I got a little creative because the fabric wasn’t looking good when I tried a few different folds on the corners since the vinyl is so thick and inflexible. Therefore (using my brig brain, I claim no authority on the proper technique of upholstery), I decided to cut squares out of the corners so that I could fold and staple down one side, then fold in a tiny bit and up the other side and staple. This gave me a little straight crease on each corner, and looked pretty professional if I can say so myself.


The one mistake I made that I will warn against, is I cut one part of the fabric to get rid of some bunching on top, but that made a bit of bunching on the side that people would actually see. For the rest instead I just pulled taut and added more staples. There was a little looseness because of the slight curve of the chair, but no one sees that side anyway.


Last thing to do was screw the seat back onto the chair. I was a little concerned I would have trouble screwing through the new fabric on a couple corners, but it was no problem at all. I merely pushed in with one hand and used a plain screwdriver with the other on all the corners and it felt solid!


I’m typing up these instructions while sitting on my nice, new desk chair. Makes the room a little more modern, all while spending less than 5 bucks! If you’d like to read about a papasan chair cushion DIY (mostly upcycling items from my house) that I did the same day, check it out here!